I’ve spent this weekend trying to make a top, or the start of one at any rate.

Choosing the size wasn’t easy and at first I cut out the pieces for a size bigger than the one I’ve since settled on. I forgot to cut out notches first time round so taking it down a size meant I could cut out notches this time (except for one that was too close to the edge). I spent a lot of time looking at online tutorials on umpteen different blogs, starting with those on sewessential.
Laying out the pieces – the front of the garment is one piece so is on the centre fold, the back is in two pieces but I cut it out on the double layer of fabric. I used the layout as shown on the pattern and was pleased I did when I read later that is so the pattern on the fabric joins up the right way (so in my case the swallows won’t be upside down).
I followed online instructions for stay-stitching round the neck (the pattern said to do stay-stitching but I’d never heard of it!), and did directional stitching like it said. At this point I realised I’d never sewn a curved line with the sewing machine before! I said as much to my husband, and I swear he sniggered. You can go off some people.
I also basted it, but faffed about for a while trying to get it the right distance from the edge, in the end using dots of yellow chalk, as it’s on the back it shouldn’t show up. Don’t know what the best way of measuring the seam allowance is – my mother-in-law seemed to do it by eye!

The pattern has an opening at the back, which I didn’t expect from the photo on the front of the pattern, so this was a bit of a challenge. Not as much of a challenge as the binding is going to be next weekend!
There’s no measurement for where the ‘black dot’ on the pattern is, but it looks like it’s a bit to one side of half-way between notch and top, so I just guessed. The pattern also says to buy a button, but nothing about a button loop or where exactly to put it, so I’ll cross that bridge when I come to it.
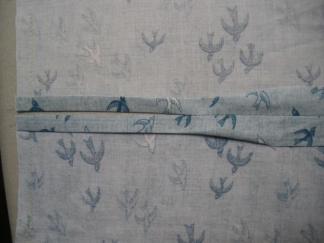
This is the seam joining the two halves of the back, pressed open, and the seam above the notional black dot folded under again.
These have to be stitched, and square-stitched underneath. I basted it and tried to do it without taking my needle out of the fabric, but sadly this didn’t work at the corners (below). Not sure what I did wrong there, lack of experience with the sewing machine. While unpicking it I realised it actually looked fine on the inside! Typical.

This is it when the three lines were sewn separately (I hadn’t unpicked the one on the left, so only had to redo the ones on the right and across the base). Looks okay from the front, I hope, though I know the one on the right is wider than its counterpart and wider at the base than the top, but not loads and I hope you wouldn’t notice when I’m wearing it unless someone’s staring at the back of my neck, and if they’re doing that I don’t want to talk to them!

From the inside, not good because of the difficulty of fastening in the ends of all those lines of stitching, particularly as machine-sewing leaves you with two lots of thread for each line. I did extra stitches inside the seam with knots pulled through so they’re hidden, but I hope they aren’t going to be uncomfortable and it doesn’t look tidy:

Where I did back stitches at the beginning of each row it’s gone loopy, somehow I need to unpick those and resew by hand, sigh:

That’s as far as I could get this weekend, despite spending a total of about 7 hours on it!I hope I may be awake enough on weekday evenings to sort out those nasty loopy bits and read up on overstitching and try to do that on the seam I’ve done. I only saw from a blog heading today that it’s something that has to be done, it isn’t something I’d thought of before. I also tried looking up some info. about hems, something that could prove a challenge later on. If I can do that through the week, then next weekend it is joining the shoulder seam and tackling the binding on the neck. Ooph! I’m feeling mentally exhausted now!
I stopped at 3.30 and went out for a walk, which I like to do at the weekend if I can before being in the city all week. Corn must be nearly ready to harvest. I was delighted at the end of the week and this weekend to have some heavy rain, after all the horrible heat (though it was still muggy when I was out today), but on this particular walk it leaves a stretch of pathway almost impassible. This bee was happy though!


Can’t wait to see how it turns out!!
LikeLike